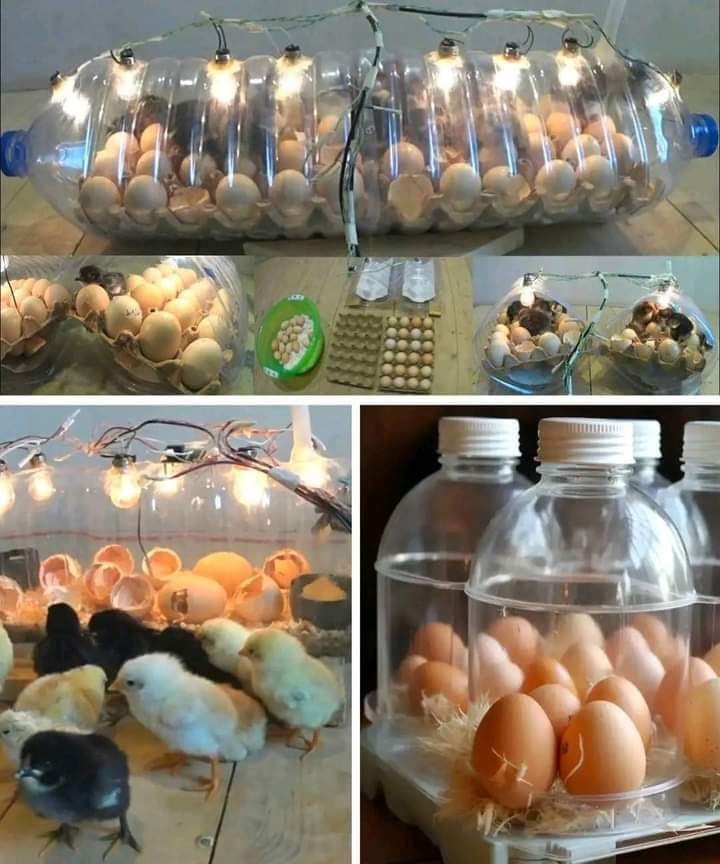
How to Build a Homemade Egg Incubator Using a Water Bottle Creating a homemade egg incubator using a water bottle is an affordable and straightforward way to hatch eggs. With a few materials and careful attention to temperature and humidity, you can successfully incubate eggs at home. Here’s a step-by-step guide:

How to Build a Homemade Egg Incubator Using a Water Bottle
Creating a homemade egg incubator using a water bottle is an affordable and straightforward way to hatch eggs. With a few materials and careful attention to temperature and humidity, you can successfully incubate eggs at home. Here’s a step-by-step guide:
Materials You’ll Need
- A large plastic water bottle (at least 2 liters).
- A low-wattage light bulb (15-25 watts) or a small heating element.
- A lamp holder or socket for the bulb.
- A thermometer and a hygrometer (to measure temperature and humidity).
- A sponge or small container for water (to maintain humidity).
- Electrical tape or duct tape.
- Scissors or a craft knife.
- Insulating material (e.g., cloth or foam).
- Small mesh or cardboard (optional, for separating eggs from the base).
Step-by-Step Instructions
1. Prepare the Water Bottle
- Cut the top third of the water bottle off. The bottom part will serve as the incubator, and the top part can act as a removable lid.
- Ensure the edges are smooth to avoid injuries when assembling.
2. Install the Heating Element
- Attach the low-wattage bulb or small heating element to the inside of the bottle using a lamp holder.
- Position the bulb so that it doesn’t directly touch the eggs but provides consistent heat throughout the incubator.
- Ensure safe wiring to prevent short circuits. Use electrical tape to secure connections.
3. Set Up Temperature and Humidity Control
- Place the thermometer inside the incubator where the eggs will be positioned. Maintain a temperature between 99°F and 102°F (37.5°C – 39°C).
- Add a sponge or a small water container to the bottom of the incubator to create humidity. Aim for humidity levels of 50-60% during incubation and increase to 65-70% during the final three days before hatching.
4. Provide Insulation
- Wrap the outside of the water bottle with insulating material to retain heat. Make sure to leave openings for ventilation.
5. Create Ventilation
- Cut small holes in the sides of the bottle to allow fresh air circulation. Proper ventilation is essential for oxygen exchange.
6. Position the Eggs
- Place the eggs inside the incubator on a soft surface or a small mesh to prevent direct contact with the bottom.
- Position the eggs horizontally and turn them manually 3-5 times daily to prevent the embryo from sticking to the shell. Stop turning the eggs three days before the expected hatch date.
7. Monitor and Adjust
- Regularly check the temperature and humidity levels, making adjustments as needed.
- Keep the incubator in a stable environment away from drafts or direct sunlight to maintain consistent conditions.
8. Hatching
- After the incubation period (typically 21 days for chicken eggs), the chicks will begin to pip (break through the shell).
- Avoid opening the incubator frequently during this stage to prevent temperature and humidity fluctuations.
Tips for Success
- Calibrate Your Thermometer: Ensure the thermometer and hygrometer are accurate before starting.
- Consistent Monitoring: Check the incubator at least twice daily to ensure proper conditions.
- Cleanliness: Keep the incubator clean to prevent contamination and increase hatching success rates.
- Backup Power: Have an alternative power source ready in case of outages.
Conclusion
Building a homemade egg incubator with a water bottle is a creative and rewarding project. By following these steps and maintaining optimal conditions, you can hatch eggs successfully, even on a budget. Enjoy the experience of watching life begin in your DIY incubator!


