Mastering tree grafting can be a rewarding way to propagate new trees, repair damaged ones, or combine the best qualities of two different trees. Here’s a step-by-step guide on how to graft trees correctly and efficiently:
Materials Needed:
- Rootstock (the tree onto which you will graft)
- Scion (the branch or bud you will graft onto the rootstock)
- Sharp grafting knife or pruning shears
- Grafting tape or rubber bands
- Grafting sealant or wax
- Alcohol or bleach solution (for sterilizing tools)
Steps:
- Choose the Right Time:
- The best time to graft is late winter to early spring, just before the rootstock begins to grow.
- Select Compatible Rootstock and Scion:
- Ensure the rootstock and scion are compatible. They should be closely related species for successful grafting (e.g., apple to apple, pear to pear).
- Prepare the Scion:
- Choose a healthy scion with several buds. Cut it to about 6-12 inches long, with 3-4 buds. Store scions in a cool, moist place until you are ready to graft.
- Prepare the Rootstock:
- Select a healthy rootstock with a diameter similar to that of the scion. Make a clean, vertical cut to prepare for grafting.
- Types of Grafts:
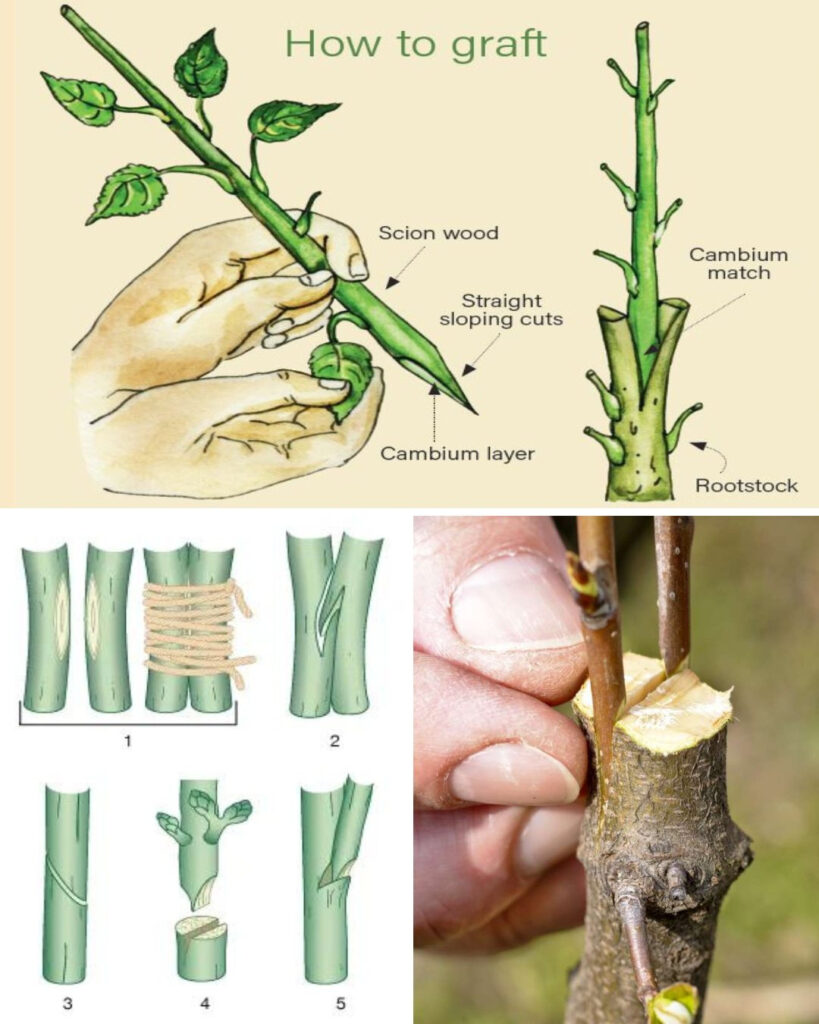
- Whip and Tongue Graft: Suitable for small diameter scions and rootstocks.
- Make a diagonal cut on both the scion and rootstock.
- Make a matching tongue cut on both pieces.
- Fit the scion and rootstock together so the cambium layers align.
- Cleft Graft: Good for larger diameter rootstocks.
- Make a vertical split in the rootstock.
- Cut the scion into a wedge shape.
- Insert the scion into the split, ensuring cambium contact.
- Bark Graft: Ideal for larger trees or branches.
- Make vertical cuts in the bark of the rootstock.
- Insert the scion under the bark flap, ensuring cambium contact.
- Whip and Tongue Graft: Suitable for small diameter scions and rootstocks.
- Align the Cambium Layers:
- The cambium layer (the thin green layer just under the bark) of the scion and rootstock must align for successful grafting. This allows nutrients to flow between the two.
- Secure the Graft:
- Use grafting tape, rubber bands, or grafting clips to hold the scion in place on the rootstock. Ensure the union is tight to prevent movement and promote healing.
- Seal the Graft:
- Apply grafting sealant, wax, or paraffin to the graft union to prevent desiccation and infection.
- Care for the Graft:
- Keep the graft area moist and protect it from direct sunlight. Consider using a plastic bag or a grafting wax to maintain humidity.
- Monitor the graft regularly for signs of growth or infection. Remove any sprouts from the rootstock that grow below the graft.
- Aftercare:
- Once the graft has taken (typically several weeks), gradually remove the grafting tape or bands to avoid girdling the tree.
- Prune the tree to maintain shape and remove any competing growth that might divert resources from the graft.
Tips for Success:
- Sanitize Tools: Always sterilize your tools with alcohol or a bleach solution to prevent disease transmission.
- Use Healthy Plant Material: Ensure both the scion and rootstock are disease-free and healthy.
- Practice Patience: Grafting can take time to master. Practice on various branches and types to improve your technique.
By following these steps and practicing regularly, you can master tree grafting and enjoy the benefits of custom-grown trees in your garden or orchard.


