Garden enthusiasts know how important it is to water their beloved plants evenly and efficiently. Whether you’re caring for vegetables, flowers, or other greenery, making sure they get the right amount of moisture can be a bit of a puzzle. Excessive watering can lead to wastage of resources, while insufficient watering can hinder growth and development. But fear not, because we have a simple and affordable solution for you: making a homemade drip irrigation system from readily available materials.
The Homemade Drip Irrigation System: A Step-by-Step Guide
Materials you need:
- A plastic bottle: Choose an old plastic bottle to reuse it and reduce waste.
- A sharp knife: To make small holes in the bottle.
- A garden hose or watering can: To fill the bottle with water.
How to create your homemade drip irrigation system:
- Select the bottle: First, select an old plastic water bottle that you no longer need. This is a great way to upcycle and give new life to an item that would otherwise end up in landfill.
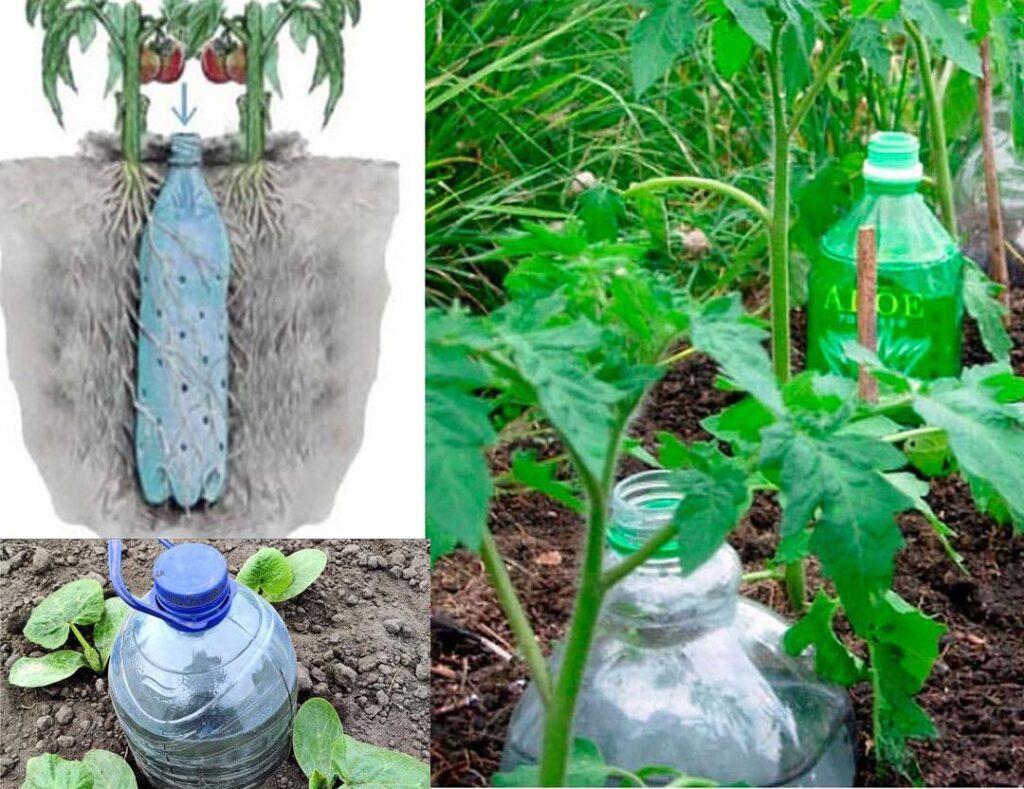
- Create water-permeable holes: Use a sharp knife to carefully poke small holes in the bottle. These holes allow water to seep slowly and evenly, ensuring a consistent supply of moisture to your plants.
- Install the bottle: Bury the bottle in the soil near your plants, making sure the neck of the bottle remains slightly above the ground. This positioning ensures that water is directed where it is needed most: the roots of the plant.
- Fill and Watch: Once the bottle is in place, fill it with water using a garden hose or watering can. Over time, the water gradually penetrates the soil, ensuring that your plants receive a constant supply of moisture.
- Enjoy the benefits: Congratulations! You have just created your own drip irrigation system. This method helps prevent over- or under-watering, promotes healthier root development, and minimizes water wastage.
Why choose a homemade drip irrigation system?
The advantages of a homemade drip irrigation system are numerous:
- Cost-effective: It is a budget-friendly solution that requires minimal investment.
- Water saving: By supplying water slowly and evenly directly to the roots, you significantly reduce water waste.
- Plant Health: This method promotes healthier plants with well-established root systems, resulting in better growth and yields.
Additional gardening tips:
- Plant Compatibility: When installing the system, make sure you do so at the same time as your plants to avoid root disturbance.
- Drought Protection: Your plants will remain consistently moist, reducing the risk of drought-related stress and preventing unwanted moisture on the foliage.
- Eco-Friendly Alternatives: If you want to be even more environmentally conscious, consider using a terracotta pot instead of a plastic bottle. The porous nature of terracotta allows water to seep through without the need for holes. Terracotta pots can also be used for houseplants and provide a sustainable watering solution.
Finally:
Whether you’re an experienced gardener or just starting out, a homemade drip irrigation system can help you maintain ideal moisture levels for your plants. This is a cost-effective, environmentally friendly and efficient way to ensure your garden thrives and thrives.
Try it in your garden and share your experiences, tips and tricks with us in the comments below. Let’s help each other care for our plants and create a greener, more sustainable world, garden by garden!


